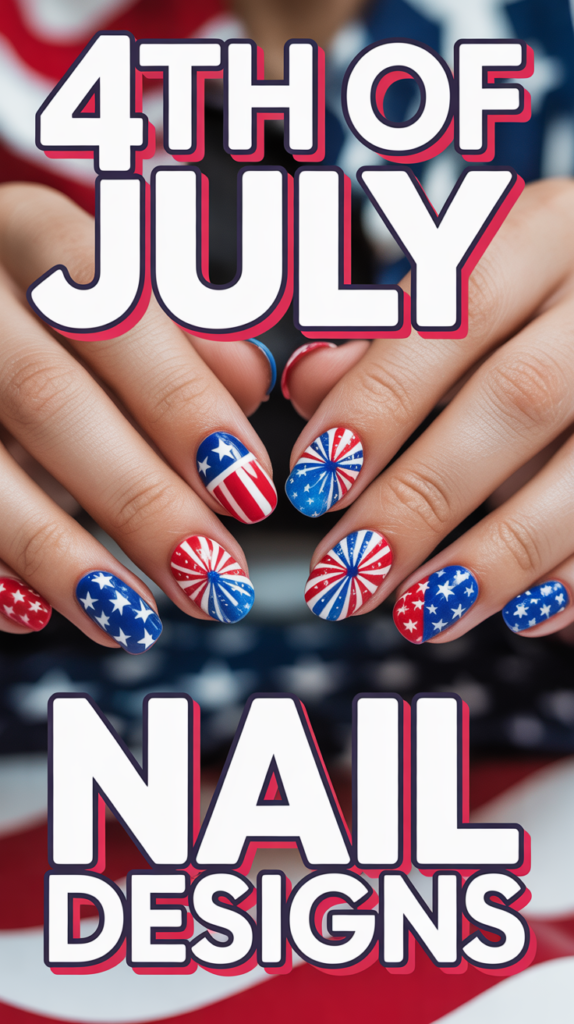
🎈 4Th Of July Nail Designs
As the vibrant hues of summer paint the skies and the air fills with anticipation, the 4th of July approaches, bringing with it a wave of patriotic celebrations. Beyond fireworks, barbecues, and parades, many seek unique and personal ways to express their American spirit. Enter 4th of July nail designs – a brilliant and increasingly popular trend that transforms your fingertips into a canvas for celebration. This guide will delve into the world of patriotic nail art, offering comprehensive insights, practical steps, and expert tips to help you showcase your pride with style and flair. Whether you’re a seasoned nail art enthusiast or a beginner looking to add a festive touch, preparing your nails for Independence Day is a fun, creative, and highly personal way to join the festivities.
What is 4Th Of July Nail Designs?
4Th Of July nail designs refer to any form of nail art specifically created to celebrate American Independence Day. This niche of nail aesthetics is characterized by its strong thematic connection to patriotism and the iconic symbols associated with the United States. At its core, it’s about translating the spirit of the 4th of July onto your nails, transforming them into miniature works of art that reflect national pride and festive joy.
The concept primarily revolves around a distinct color palette: the classic red, white, and blue. These colors are not just used individually but often combined in intricate patterns or bold statements. Beyond colors, key motifs are central to these designs. Stars, symbolizing the states, and stripes, representing the original thirteen colonies, are perhaps the most recognizable elements, frequently integrated to mimic the American flag or abstracted into more contemporary patterns.
However, 4Th Of July nail designs extend far beyond simple flags. They encompass a wide array of creative expressions, including:
- Fireworks: Exploding designs often created with glitter, metallic polishes, or delicate brushwork to mimic the dazzling night sky displays.
- Sparkle and Glitter: Incorporating various glitters, shimmers, and rhinestones to add a celebratory sparkle, reminiscent of parades and festive lights.
- Abstract Patterns: Modern interpretations using the patriotic color scheme in unique geometric shapes, ombré effects, or splatter designs.
- Themed Imagery: Subtle nods like eagles, Statue of Liberty silhouettes, or even playful interpretations like hot dogs or picnic blankets.
These designs can be achieved through various techniques, from simple polish applications and decals to more advanced methods like gel polish, acrylics, nail stamping, freehand painting, or even professional salon services. The versatility means there’s a 4th of July nail design for every skill level, nail length, and personal style, making it an accessible and engaging way for anyone to participate in the holiday’s vibrant celebrations.
Key Features
4Th Of July nail designs stand out due to several defining characteristics that make them unique and highly sought after during the Independence Day period. Understanding these key features helps to appreciate the depth and versatility of this festive nail art trend.
- Patriotic Color Palette: The most fundamental feature is the unwavering adherence to the red, white, and blue color scheme. These colors are not merely decorative; they are symbolic, representing valor, purity, and justice, respectively. While traditional shades are common, variations like pastel versions, metallic reds, or navy blues also find their place, offering flexibility within the patriotic theme.
- Iconic Motifs and Symbolism: Designs frequently incorporate recognizable American symbols. Stars (representing the states) and stripes (representing the original colonies) are paramount. Beyond the flag, fireworks, eagles, and even subtle references to Americana like denim textures or picnic patterns can be found, instantly communicating the holiday’s spirit.
- Versatility Across Styles and Techniques: Whether you prefer a subtle accent nail, a full set of intricate designs, or something in between, 4th of July nail art is incredibly adaptable. It can be achieved using regular nail polish, long-lasting gel polish, durable acrylics, or even temporary nail wraps and stickers. Techniques range from simple color blocking and glitter application to complex freehand painting, stamping, and 3D embellishments.
- Expressive and Fun: This type of nail art is a vibrant form of personal expression. It allows individuals to showcase their national pride in a creative, fashionable, and often playful manner. It’s a conversation starter and a clear indicator of participation in the holiday’s joyful atmosphere, adding an extra layer of festivity to any outfit or gathering.
- Temporary and Customizable: Unlike permanent body art, nail designs are temporary, allowing for experimentation year after year. They can be easily removed or changed, offering the freedom to try different styles, adapt to evolving trends, or simply switch up your look after the holiday. This customizability extends to personalizing designs to match individual preferences, from minimalist to maximalist aesthetics.
- Accessibility for All Skill Levels: From easy-to-apply nail stickers and simple striped patterns suitable for beginners to highly detailed, artistic creations for advanced enthusiasts or professionals, there’s a design for everyone. This broad accessibility ensures that anyone can participate in this fun holiday tradition, regardless of their artistic talent or time commitment.
How to Get Started
Creating your own 4Th Of July nail designs can be a rewarding and fun experience. Whether you’re aiming for a simple patriotic accent or an elaborate themed masterpiece, following these practical steps will set you up for success.
-
Gather Your Supplies:
- Polishes: Essential red, white, and blue nail polishes. Consider a glitter polish (silver or gold work well for fireworks) and a clear top coat and base coat.
- Tools:
- Dotting Tools: For creating stars, polka dots, or precise details.
- Striping Brushes: Fine brushes for drawing straight lines and intricate patterns.
- Sponges: For ombré or gradient effects.
- Tweezers: Useful for applying decals or rhinestones.
- Nail Art Brushes: Various sizes for different design elements.
- Embellishments: Small rhinestones, nail art decals (stars, flags, fireworks), or loose glitter for extra sparkle.
- Essentials: Nail file, buffer, cuticle pusher, nail polish remover, cotton pads, and a clean-up brush (a small brush dipped in remover for tidying edges).
-
Prepare Your Nails:
Proper preparation is crucial for a long-lasting and flawless design. Start by removing any old polish. File your nails to your desired shape and gently buff the surface to create an even canvas. Push back or trim your cuticles, and wash your hands thoroughly to remove any oils or debris. Dehydration is key here, so ensure your nails are completely dry before proceeding.
-
Apply a Base Coat:
Don’t skip this step! A good quality base coat protects your natural nails from staining (especially with vibrant reds and blues) and provides a smooth surface for your polish to adhere to, which helps extend the life of your manicure. Apply a thin, even layer and allow it to dry completely.
-
Choose Your Design and Base Colors:
Decide on the design you want to create. Are you going for classic stripes, a full flag, scattered stars, fireworks, or an abstract pattern? Apply your chosen base colors. For example, if you’re doing a classic flag, you might paint some nails white and others blue or red. Apply two thin coats for opaque coverage, allowing each coat to dry fully before applying the next.
-
Create Your Design:
This is where the fun begins!
- Stripes: Use a striping brush with a contrasting color, or apply thin strips of nail art tape before painting and peel off once dry for crisp lines.
- Stars: Use a dotting tool for simple star-like dots, or a small brush for more defined star shapes. Nail art decals are also an excellent option for perfect stars.
- Fireworks: Use a thin brush to create radiating lines from a central point, or dab glitter polish strategically.
- Ombré/Gradient: Use a makeup sponge to dab colors onto the nail, blending them together.
Work slowly and steadily. If you make a mistake, use your clean-up brush dipped in remover to correct it immediately.
-
Seal with a Top Coat:
Once your design is completely dry (this is critical to prevent smudging), apply a generous layer of clear top coat. A good top coat will protect your design, add shine, and significantly extend the wear of your manicure. For extra durability, you can apply a second thin layer after the first has dried.
-
Clean Up:
Dip a small brush (like an eyeliner brush) into nail polish remover and carefully clean up any polish that has gotten onto your skin around the cuticles and sidewalls of your nails. This creates a polished, professional finish.
Tips for Success
Achieving stunning 4Th Of July nail designs requires a blend of good technique, quality products, and a bit of patience. Here are some pro tips to help you master your patriotic manicure:
- Invest in Quality Products: High-quality nail polishes, base coats, and top coats make a significant difference. They apply smoother, offer better pigmentation, dry faster, and last longer. Good tools, like fine-tipped brushes and dotting tools, will also provide more control and precision, making intricate designs much easier to execute.
- Practice Makes Perfect (and Patient): If you’re new to nail art, start with simpler designs like basic stripes or dots. Don’t get discouraged if your first attempt isn’t flawless. Nail art is a skill that improves with practice. Try practicing on a nail wheel or even a piece of paper before applying it to your actual nails. Patience is key; rushing can lead to smudges and frustration.
- Layer Thin Coats and Allow Them to Dry: This is arguably the most crucial tip for any nail art. Applying multiple thin coats of polish (including base and top coats) is always better than one thick coat. Thin coats dry faster, reduce bubbling, and create a stronger, more even finish. Ensure each layer is completely dry to the touch before applying the next, especially before adding design elements or a top coat, to prevent smudging and dragging.
- Utilize Nail Art Tape or Stencils: For crisp, clean lines and geometric patterns, nail art tape (striping tape) or stencils are your best friends. Apply the tape after your base color is fully dry, paint over it, and then carefully peel it off immediately after painting while the polish is still wet (but not gooey) for sharp edges.
- Seek Inspiration and Adapt: Browse platforms like Pinterest, Instagram, or dedicated nail art blogs for a wealth of 4th of July design ideas. Don’t feel pressured to replicate complex designs exactly. Instead, take inspiration and adapt elements to suit your skill level and personal style. Mix and match ideas, or simplify intricate patterns into manageable components.
Common Mistakes to Avoid
While creating 4Th Of July nail designs is a fun and creative endeavor, certain common pitfalls can hinder your results and shorten the life of your patriotic manicure. Being aware of these mistakes can help you achieve a more professional and long-lasting finish.
- Skipping Nail Preparation: One of the most frequent mistakes is neglecting proper nail prep. Not cleaning, filing, buffing, or pushing back cuticles can lead to polish lifting, chipping prematurely, and an uneven application. Oils, debris, and ragged cuticles are enemies of a perfect manicure.
- Applying Thick Coats of Polish: It’s tempting to try and achieve opaque coverage with one thick coat, but this often leads to bubbling, smudging, and extremely slow drying times. Thick coats are also more prone to chipping. Always opt for two or three thin, even coats, allowing each to dry thoroughly.
- Not Letting Layers Dry Completely: Impatience is a manicure’s worst enemy. Applying a new color, design element, or top coat over wet or tacky polish will inevitably lead to smudging, dragging, and an uneven finish. This is especially critical when layering different colors for intricate designs.
- Using a Low-Quality Top Coat (or Skipping It Entirely): A good top coat is the protector and finisher of your nail art. A cheap or old top coat can dull the shine, cause premature chipping, or even yellow over time. Skipping it means your design is exposed and vulnerable to damage, significantly reducing its longevity.
- Overloading Brushes with Polish: Whether it’s the main polish brush or a fine nail art brush, using too much polish leads to messy application, flooding the cuticles, and lack of precision. Wipe excess polish off the brush before applying to ensure cleaner lines and better control.
- Trying Overly Complex Designs Too Soon: While inspiration is great, attempting an advanced, intricate design as a beginner can lead to frustration and a less-than-satisfactory outcome. Start with simpler designs, build your skills, and gradually work your way up to more elaborate patterns.
- Forgetting the Clean-Up Brush: Even the steadiest hands can get a little polish on the skin. Neglecting to clean up the edges with a small brush dipped in remover can make an otherwise perfect manicure look messy and unprofessional. A crisp edge elevates the entire look.
FAQ
Here are answers to some common questions about 4Th Of July nail designs to help you navigate your patriotic nail art journey.
- Q1: How long do 4th of July nail designs typically last?
- A1: The longevity of your 4th of July nail designs largely depends on the type of polish used and how well you care for your nails. Regular nail polish with a good top coat can last anywhere from 3-7 days. Gel polish, when applied correctly, can last 2-3 weeks without chipping. Acrylic or dip powder manicures tend to last the longest, often 3-4 weeks. Factors like daily activities (e.g., washing dishes without gloves) can also impact wear time.
- Q2: Can I do these designs on short nails?
- A2: Absolutely! 4th of July nail designs are incredibly versatile and can be adapted for any nail length, including short nails. Simple stripes, scattered stars, polka dots, or even abstract color blocking in red, white, and blue look fantastic on shorter nails. You might just need to scale down the complexity of the design or focus on one accent nail if space is limited.
- Q3: What if I’m not artistic or don’t have a steady hand?
- A3: Don’t worry if you’re not a natural artist! There are many fantastic options for achieving stunning 4th of July nails without freehand drawing. Nail art stickers and decals are incredibly easy to apply and come in a vast array of patriotic designs. Nail stamping kits allow you to transfer intricate patterns onto your nails with minimal effort. Nail wraps are another excellent alternative, providing a full design that adheres directly to your nail. For a completely hassle-free experience, consider visiting a professional nail salon.
- Q4: Are there any non-traditional color options for 4th of July nails?
- A4: While red, white, and blue are classic, you can definitely experiment with non-traditional takes! Consider incorporating metallic shades like gold or silver for extra sparkle, especially for fireworks or star accents. Pastel versions of red, white, and blue (e.g., light pink, sky blue, cream) can offer a softer, more whimsical aesthetic. You could also introduce glitter polishes in unexpected colors that complement the patriotic theme, like iridescent or holographic glitters, to add a unique twist while still keeping the festive spirit.
Conclusion
As the 4th of July draws near, embracing the spirit of Independence Day through your nail art offers a vibrant and personal way to celebrate. From classic stripes and stars to dazzling fireworks and abstract interpretations, 4th of July nail designs provide an expansive canvas for creativity and patriotic expression. This comprehensive guide has walked you through the essence of this festive trend, highlighted its key features, and provided practical steps for getting started, along with crucial tips for success and common mistakes to avoid. Whether you choose to meticulously craft a design yourself or opt for the ease of decals and professional services, the goal remains the same: to adorn your nails with pride and joy.
So, as you finalize your holiday plans, don’t forget to incorporate this fun and fashionable element. Let your fingertips sparkle with red, white, and blue, becoming a miniature celebration of freedom and festivity. Embrace the process, experiment with different styles, and enjoy the compliments that are sure to come your way. This 4th of July, make a statement from your head to your fingertips, showcasing your American spirit with dazzling, unforgettable nail designs!