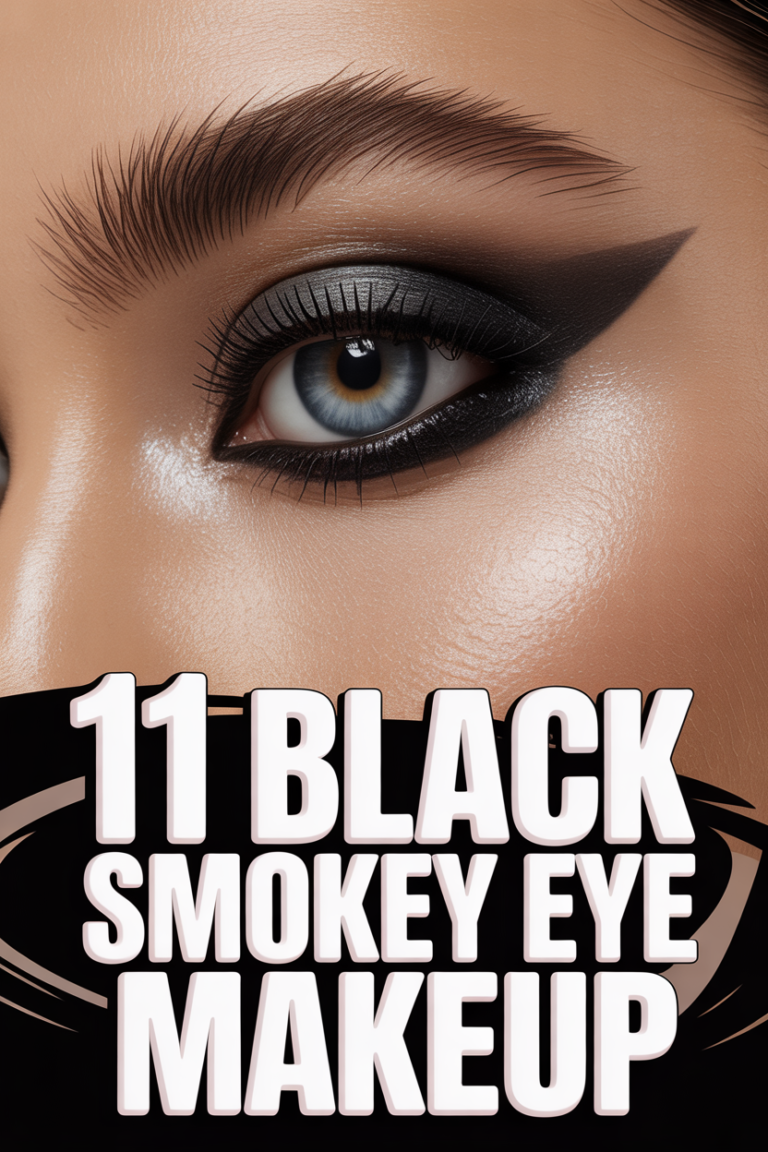
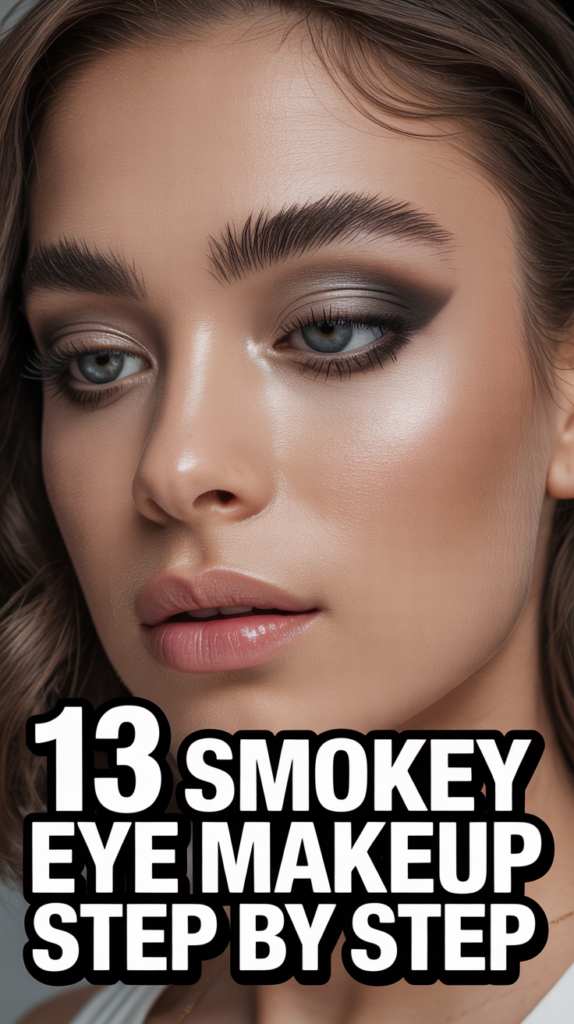
👀 13 Smokey Eye Makeup Step By Step
💄 The Everyday Glamour Routine
You do not need to spend hundreds of dollars at Sephora to achieve a flawless, airbrushed finish. Professional makeup artists secretly rely on these 5 incredible, highly-rated viral drug store dupes and tools to create stunning looks that last all day.
✨ e.l.f. Power Grip Primer
The undisputed holy grail of primers that broke the internet. The unique gel-based formula literally 'grips' onto your foundation, blurring pores and completely preventing your makeup from melting off, creasing, or fading for up to 14 hours.
💧 Real Techniques Miracle Complexion Sponges
Stop applying liquid foundation with brushes that leave streaks. When used slightly damp, these ultra-soft, latex-free sponges seamlessly bounce liquid products into your skin for an incredibly natural, dewy, 'no-makeup' finish.
🖤 Maybelline Sky High Lengthening Mascara
You don't need expensive lash extensions. This wildly popular formula features a flexible tower brush that bends to volumize and extend every single tiny lash from root to tip without flaking, smudging, or weighing your eyes down.
🌟 L'Oreal True Match Lumi Glotion
The ultimate secret for that radiant 'glass skin' look. Use it alone for a sheer, healthy tint on no-makeup days, or mix a tiny drop into your foundation to instantly add an incredibly expensive-looking, natural luminosity to your face.
🌋 Revlon Oil-Absorbing Volcanic Roller
The modern replacement for messy blotting papers. Made from real volcanic stone, this tiny tool fits perfectly in your purse. Simply roll it across your T-zone to instantly absorb excess shine without messing up the makeup underneath.
So, you wanna master the smokey eye, huh? Good choice. It’s like the little black dress of makeup looks – always chic, always makes you feel like you could walk a red carpet (or at least conquer that grocery run with extra sass). Forget those intimidating tutorials that make it look like you need an art degree. We’re breaking it down, friend, so you can unleash your inner glam goddess without the existential crisis.
No more guessing games, no more ending up looking like you’ve been punched (unless that’s the vibe you’re going for, in which case, you do you). We’re giving you the straight-up, no-nonsense guide to achieving that perfectly sultry gaze. Let’s get smoky.
1. Prep Your Canvas
Okay, before we get all smoky, let’s make sure your lids are ready for their close-up. Think of this as laying the groundwork for a masterpiece. You wouldn’t paint on a dirty canvas, right? Exactly.
Start with a clean, moisturized face. Gently pat a tiny bit of your regular face moisturizer around the eye area. This helps everything apply smoothly and stops your skin from looking like the Sahara desert. A little hydration goes a long way, trust us.
Why it works: A smooth, prepped surface means your makeup will glide on like a dream and actually stay put. No patchy business here.
2. Prime Time
This step is non-negotiable, darlings. An eye primer is your secret weapon against creasing and fading. It’s basically a sticky base that grabs onto your eyeshadow pigment and holds it hostage all day (or night).
Apply a thin layer of your chosen eye primer all over your lid, from lash line to brow bone. Give it a moment to get tacky. Our pro tip? If you’re out of primer, a tiny dab of concealer set with a translucent powder can work in a pinch, but a dedicated primer is always best for serious staying power.
Why it works: Your smokey eye will look vibrant and fresh for hours, resisting the urge to migrate to your crease. Flawless longevity, unlocked.
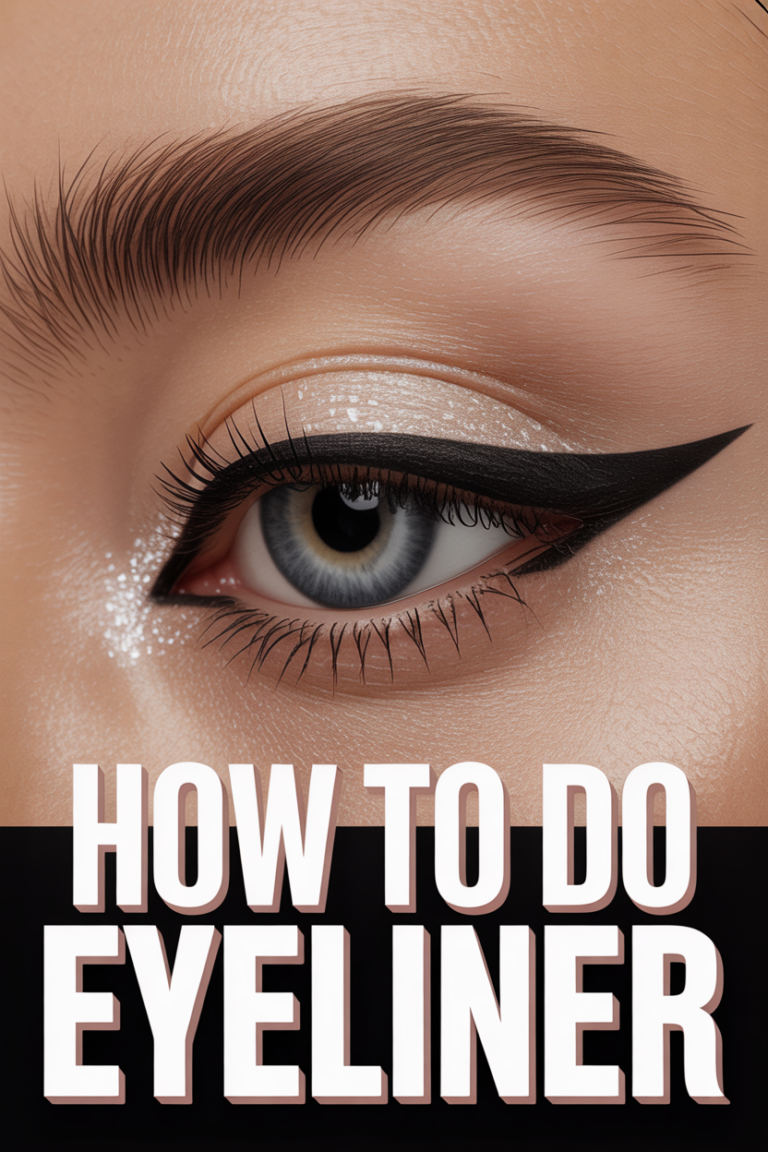
3. Liner First Strategy
Surprise! We’re starting with eyeliner. This isn’t your grandma’s smokey eye tutorial, okay? Using a soft kohl eyeliner pencil as your base creates an intense, smudgy foundation that’s easier to blend later.
Draw a thick line along your upper lash line. Don’t worry about perfection; messy is good here. You’ll smudge it out anyway. Choose a dark brown, black, or deep plum liner to set the tone. This step helps build intensity right from the start.
Why it works: This technique builds depth from the ground up, making your smokey eye look effortlessly rich and dimensional.
4. Smudge It Out
Now for the fun part: turning that messy line into a dreamy haze. Grab a small, dense smudger brush or even a Q-tip if you’re feeling resourceful.
Gently smudge the eyeliner line upwards and outwards, softening the edge. You want to diffuse the harsh line, creating a soft gradient. Work quickly, as some kohl liners set fast. Don’t be shy; really get in there and blend it until it looks smoky, not just smudged. This is where the magic starts.
Why it works: It creates a seamless transition and a soft, diffused base for your eyeshadow, making your blending job easier later on.
5. The Base Shade
Time to introduce your main character eyeshadow. Pick a medium-toned shadow that complements your liner – think charcoal grey, deep taupe, or a rich brown. This shade will go right over your smudged liner.
Using a flat shader brush, pat the shadow directly onto your lid, concentrating it over the area where you smudged your liner. Really press that pigment in there for maximum impact. A good pro tip is to tap off excess powder from your brush to avoid fallout.
Why it works: This step intensifies the color and helps set the creamy liner, preventing it from creasing and ensuring it lasts.
6. Deepen the Crease
To give your eye some serious definition, we’re adding a darker shade into the crease. This creates the illusion of depth and makes your eyes pop. Grab a slightly darker shade than your base, or even the same shade if it’s already quite dark.
With a fluffy blending brush, apply the darker shadow into your crease using small, circular motions. Blend it upwards and outwards, connecting it with your lid color. Don’t go too high – you want to keep the darkest part in the crease for that dramatic effect.
Why it works: This step adds dimension and structure, making your eyes appear larger and more captivating. It’s the secret to that sultry gaze.
7. Outer V Magic
The “outer V” is where the real drama lives. This is the outer corner of your eye, forming a V-shape from your lash line up into your crease. Pick your darkest shadow for this – usually black or a very deep charcoal.
Using a small, precise brush, carefully pack this darkest shade into the outer V. Don’t be afraid to build it up slowly. Blend it inward, just a touch, connecting it to your crease color. This creates an intense, smoky gradient that pulls everything together.
Why it works: This technique adds maximum depth and intensity to the outer corner, giving you that classic, alluring smokey eye shape.
8. Lower Lash Line Love
A true smokey eye isn’t complete without some action on the lower lash line. This balances the look and ties everything together. Use the same kohl pencil you started with.
Gently line your lower lash line, getting as close to the lashes as possible. Then, take that trusty smudger brush and softly smudge the line downwards and outwards. You can even take a little bit of your lid shade and pat it over the smudged liner for extra staying power. No raccoon eyes, just chic smoke.
Why it works: It frames the entire eye, making the look cohesive and adding to the overall sultry, smoky effect. It’s the missing piece of the puzzle.
9. Blend, Blend, Blend (Again)
If there’s one commandment for smokey eyes, it’s this: thou shalt blend. Grab a clean, fluffy blending brush and go over all the edges. You want a seamless transition between all your shades, not harsh lines.
Use light, circular motions to buff out any visible lines. Think of it as airbrushing your eyeshadow. Don’t add more product here; just soften what’s already there. Our insider tip: blending upwards towards your brow bone creates a lifted, elongated effect.
Why it works: Seamless blending is the hallmark of a professional-looking smokey eye. It makes all the difference between “messy” and “masterpiece.”
10. Inner Corner Pop
To brighten and open up your eyes, add a touch of sparkle to the inner corner. This small detail makes a huge impact, especially with a dark smokey eye.
Using a small pencil brush, dab a shimmery light shade (like champagne, silver, or a pale gold) into the inner corner of your eye. You can also extend it slightly onto the lower lash line for an extra pop. This little touch of light is a game-changer.
Why it works: It instantly brightens and awakens your eyes, providing a beautiful contrast to the dark smokey shades and making you look wide awake.
11. Lash Line Definition
Even with all that shadow, a little extra lash line definition never hurt anyone. This step makes your lashes look thicker and fuller, completing the eye look.
Take a liquid or gel eyeliner and draw a thin line right along your upper lash line, just to fill in any gaps between your lashes. A tiny wing is optional but always welcome. This creates a polished finish and truly defines your eyes.
Why it works: It adds an extra layer of intensity and definition, ensuring your lashes look dense and fabulous against the smoky backdrop.
12. Mascara Mania
No smokey eye is complete without a generous coating of mascara. This is where your lashes come to life and frame all your hard work. Go for a volumizing and lengthening mascara.
Curl your lashes, then apply at least two coats of mascara to both your upper and lower lashes. Wiggle the wand at the base of your lashes and pull through to the tips for maximum impact. Don’t be shy; load ’em up. False lashes are also an amazing addition if you want to dial up the drama even further.
Why it works: Mascara opens up the eyes and adds that final touch of glam, making your smokey eye look utterly captivating.
13. Clean Up Crew
Alright, superstar, you’re almost there! No matter how careful you are, a little fallout is inevitable. This is where we clean things up for a crisp finish.
Grab a cotton pad with a tiny bit of micellar water or a makeup wipe. Gently clean up any stray shadow or smudges under your eyes. You can also use a small brush with a touch of concealer to sharpen the edge of your smokey eye, giving it a lifted, cat-eye effect. This final touch makes all the difference.
Why it works: A clean finish elevates your entire look from “attempted” to “absolutely nailed it.”
✨ The Ultimate Skin & Hair Care Kit
The best makeup in the world cannot hide poorly treated skin or damaged hair. If you want to glow from the inside out, these 5 science-backed formulations and trusted tools are the absolute essential core of any functional, results-driven beauty regimen.
🐌 COSRX Snail Mucin 96% Repair Essence
The Korean skincare secret that completely revolutionized Western beauty routines. Applying this deeply hydrating, lightweight essence absolutely transforms dull, textured skin overnight into a plump, hydrated, and insanely smooth canvas.
🧪 Paula's Choice 2% BHA Liquid Exfoliant
Stop aggressively scrubbing your face. This gentle, leave-on chemical exfoliant sinks deep into pores to dissolve blackheads, visibly shrink enlarged pore size, and effectively erase stubborn acne breakouts without leaving your skin red or irritated.
🩹 Mighty Patch Original Hydrocolloid Stickers
The ultimate emergency fix. When you feel a massive blemish forming, do not pop it! Stick one of these medical-grade patches on overnight and watch it completely absorb all the impurities while protecting the skin from scarring.
💨 Revlon One-Step Volumizer Hot Air Brush
Achieve a massive bouncy, salon-quality blowout at home in literally half the time. This ingenious tool dries, brushes, and heavily volumizes your hair all at once, completely saving your arms from the exhausting juggle of a round brush and heavy dryer.
💧 Olaplex No. 7 Bonding Hair Oil
If you use heat tools or color your hair, this is non-negotiable. This highly concentrated, weightless styling oil instantly tames frizz, dramatically increases shine, and actually repairs broken hair bonds while providing up to 450°F heat protection.
Conclusion
See? Not so scary now, is it? You’ve officially graduated from smokey eye newbie to bona fide blending boss. Remember, practice makes perfect, but confidence makes it iconic. Don’t be afraid to play with different shades – a smokey eye doesn’t always have to be black; deep greens, blues, or even purples can be absolutely stunning.
Go on, give those eyes a little drama – you’ve earned it. Now go forth and smolder!