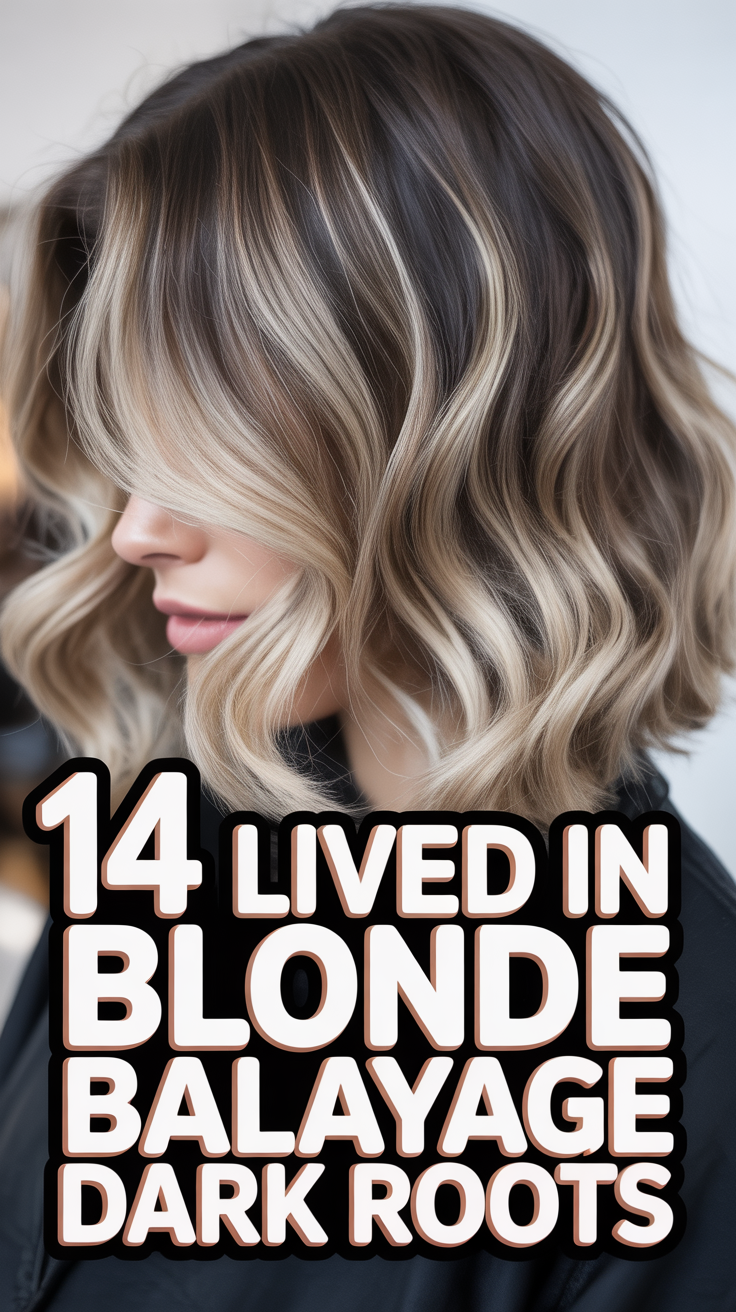
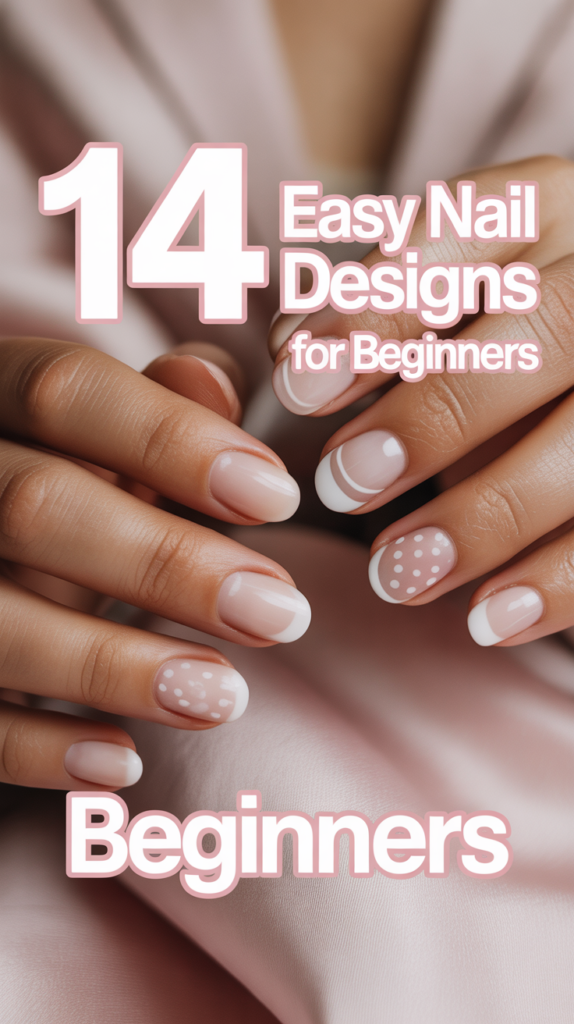
💅 14 Easy Nail Designs For Beginners
So, you’ve scrolled through Insta, seen those impossibly perfect manis, and thought, ‘Yeah, right, like I could ever do that.’ Guess what? You totally can. We’re about to ditch the salon stress and dive into some seriously simple nail art that even your butterfingers can master. No art degree required, just a steady hand (mostly) and a good Netflix binge. Let’s get those digits looking fierce, shall we
1. The Classic Dot
Dots are your new best friend. Seriously, they’re the ultimate low-effort, high-impact move. Grab a bobby pin or a dotting tool, dab a contrasting polish onto your base color. Think polka dots or a single accent dot near the cuticle.
Pro tip: Make sure your base coat is completely dry before adding dots, or you’ll drag it. This design offers instant chic with zero stress.
2. Glitter Gradient
Want to look fancy without actually being fancy Glitter gradient has your back. Apply a base color, then use a makeup sponge to dab glitter polish from the tip of your nail downwards, fading as you go. Focus most glitter at the tip for maximum sparkle.
Pro tip: Cut a small piece off a regular makeup sponge for precision application. It hides imperfections and screams ‘party ready’.
3. Minimalist Stripe
Stripes aren’t just for zebras or referees anymore. They’re for your nails, darling. Paint a base color, let it dry completely. Use a thin striping brush or even a fine-tipped permanent marker (sealed with top coat) to draw a single line.
Pro tip: Practice on paper first to get a steady hand. This look is effortlessly cool and surprisingly elegant.
4. Half-Moon Mani
Channel your inner vintage starlet with this surprisingly simple look. Paint your whole nail with one color. Once dry, place a reinforcement sticker (those hole punch things) near your cuticle, then paint the rest of the nail with a second color. Peel the sticker off carefully.
Pro tip: Press the sticker down firmly to prevent polish bleeding underneath. It looks intricate, but it’s basically cheating.
5. Abstract Swirls
If you can draw a wonky line, you can do abstract swirls. Embrace the beautiful mess. On a dry base, use a small brush or toothpick to draw random, squiggly lines or blobs. Don’t overthink it; the more organic, the better.
Pro tip: Use two or three contrasting colors for maximum visual interest. This design is totally unique, and mistakes just add character.
6. Ombre Nails
Ombre isn’t just for hair anymore. Your nails deserve a smooth color transition too. Paint two or three colors onto a makeup sponge, overlapping slightly. Dab the sponge onto your nail. Repeat until opaque for that perfect fade.
Pro tip: Clean up around your cuticles with a brush dipped in polish remover before it dries. It looks professional, but feels like magic.
7. Tape Mani
Who knew office supplies could be so fashionable Tape is your secret weapon. Paint a base color. Once dry, place thin strips of painter’s tape or scotch tape to create geometric shapes. Paint over with a second color, then peel off the tape.
Pro tip: Let each layer dry completely to avoid sticky disasters. Patience is a virtue here for sharp lines and easy execution.
8. Negative Space
Less is more, darling. Embrace your inner minimalist with this super chic, barely-there look. Instead of painting your whole nail, leave some areas clear. Think a bold stripe down the middle, or a half-moon shape near the cuticle, showing off your natural nail.
Pro tip: A clear base coat is essential for protecting your natural nail. It’s modern, clean, and ridiculously easy.
9. Dry Brush Stroke
Pretend you’re a tortured artist, but like, for nails. Wipe most of the polish off your brush. Lightly drag the semi-dry brush across your nail in random strokes. Layer different colors for a textured effect that looks effortlessly cool.
Pro tip: Don’t overload the brush. Less is definitely more for this technique. It looks artistic, but requires minimal precision.
10. Accent Nail
Can’t commit to a full set of art Just pick one nail. Problem solved. Paint all nails one color, then pick one (usually the ring finger) and make it pop with glitter, a different color, or a simple design. It’s the ultimate lazy girl hack.
Pro tip: Keep the accent nail simple if you’re just starting out. A different solid color is totally valid. This gives you a taste of nail art without the commitment.
11. Confetti Nails
Who needs actual confetti when your nails can do all the celebrating Apply a base coat. While still wet, gently place small glitter pieces, tiny dots of contrasting polish, or even small nail art decals randomly across the nail for a festive vibe.
Pro tip: Use a toothpick or an orange stick to pick up and place individual pieces. It’s fun, playful, and completely forgiving.
12. Simple French Tip Modern Twist
The French mani is back, baby, but we’re giving it an approachable glow-up. Instead of a perfect white line, try a colored tip, a glitter tip, or even a slightly thicker, more forgiving line. You can also use stickers as guides for an easier application.
Pro tip: Try painting the tip freehand with a very small amount of polish on the brush. It’s an elevated look with minimal precision required.
13. Water Decals Stickers
Okay, so maybe you’re not painting this one, but it still counts as nail art. Apply a base color. Cut out your chosen decal, dip it in water for a few seconds, then slide it onto your nail. Smooth it out and seal with top coat.
Pro tip: Make sure your base color is completely dry before applying the decal. This gives you instant intricate designs with zero artistic skill.
14. Matte Gloss Combo
Who says you can only have one finish Let’s get textural. Apply a matte top coat over your entire nail. Once dry, use a regular glossy top coat to draw simple shapes (dots, stripes) on top. The contrast is absolutely everything.
Pro tip: Ensure the matte top coat is fully cured before adding the glossy details. It’s subtle, sophisticated, and surprisingly easy to achieve.
Conclusion
See We told you. Ditch the nail art intimidation. You’ve now got 14 (yes, FOURTEEN) ridiculously easy ways to level up your mani game without needing a degree in fine arts. Go forth, experiment, and remember: if it looks a little wonky, just call it ‘abstract.’ You’re welcome.