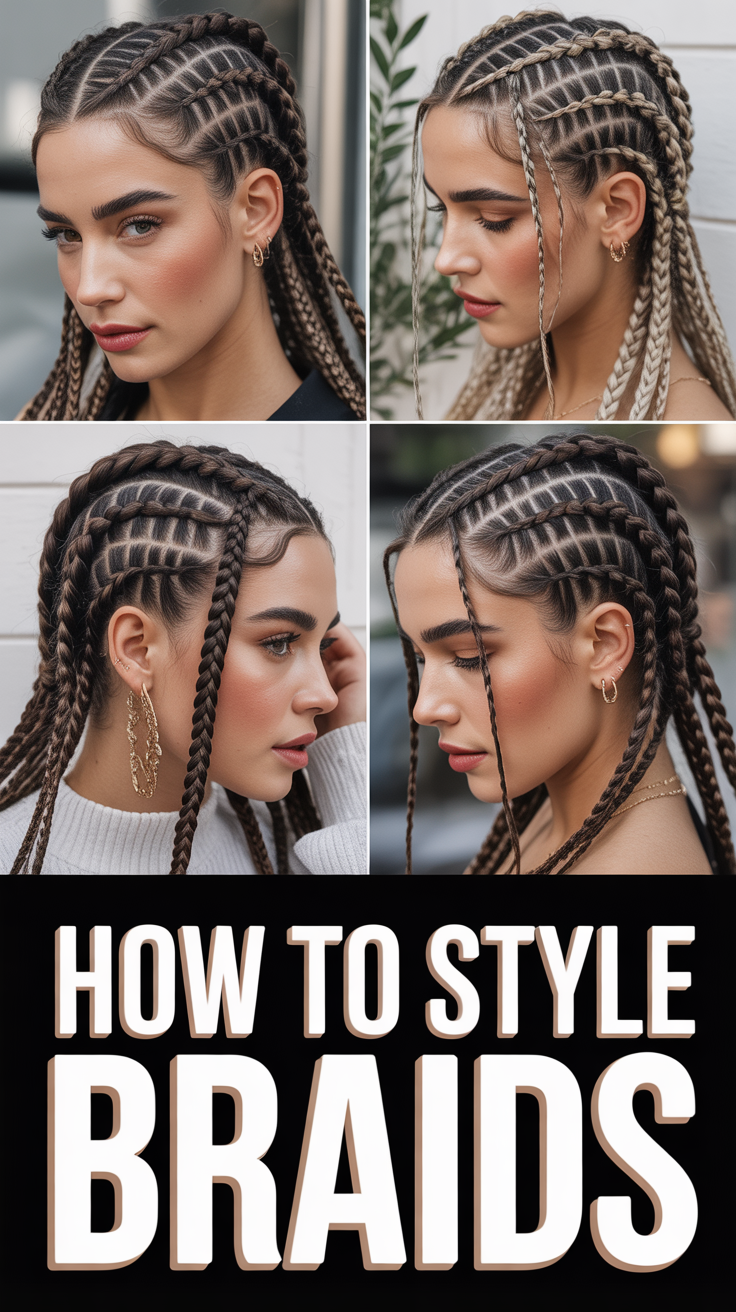
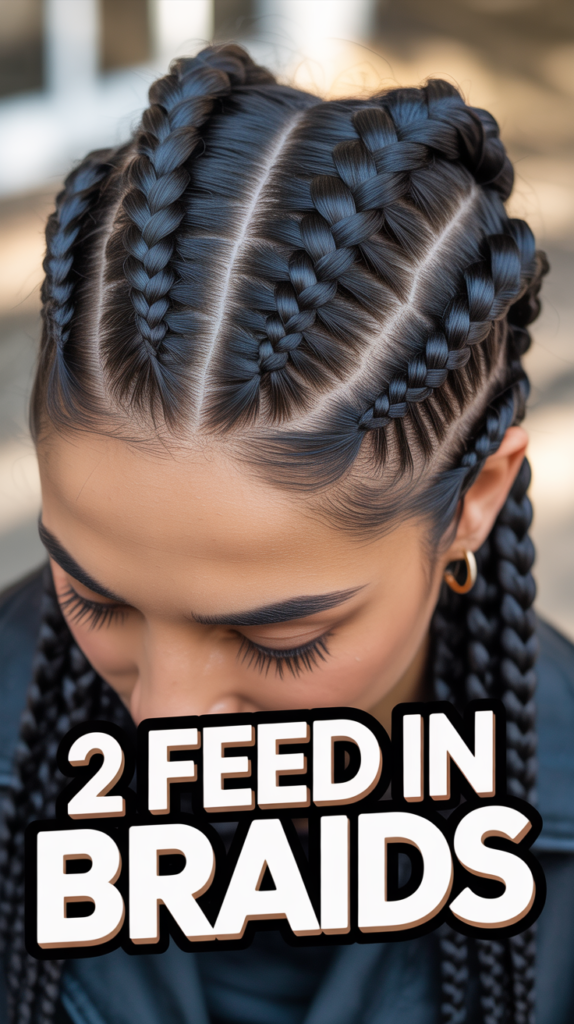
✨ 2 Feed In Braids
💄 The Everyday Glamour Routine
You do not need to spend hundreds of dollars at Sephora to achieve a flawless, airbrushed finish. Professional makeup artists secretly rely on these 5 incredible, highly-rated viral drug store dupes and tools to create stunning looks that last all day.
✨ e.l.f. Power Grip Primer
The undisputed holy grail of primers that broke the internet. The unique gel-based formula literally 'grips' onto your foundation, blurring pores and completely preventing your makeup from melting off, creasing, or fading for up to 14 hours.
💧 Real Techniques Miracle Complexion Sponges
Stop applying liquid foundation with brushes that leave streaks. When used slightly damp, these ultra-soft, latex-free sponges seamlessly bounce liquid products into your skin for an incredibly natural, dewy, 'no-makeup' finish.
🖤 Maybelline Sky High Lengthening Mascara
You don't need expensive lash extensions. This wildly popular formula features a flexible tower brush that bends to volumize and extend every single tiny lash from root to tip without flaking, smudging, or weighing your eyes down.
🌟 L'Oreal True Match Lumi Glotion
The ultimate secret for that radiant 'glass skin' look. Use it alone for a sheer, healthy tint on no-makeup days, or mix a tiny drop into your foundation to instantly add an incredibly expensive-looking, natural luminosity to your face.
🌋 Revlon Oil-Absorbing Volcanic Roller
The modern replacement for messy blotting papers. Made from real volcanic stone, this tiny tool fits perfectly in your purse. Simply roll it across your T-zone to instantly absorb excess shine without messing up the makeup underneath.
The world of protective hairstyles is vast and ever-evolving, offering a myriad of options for individuals seeking to protect their natural hair, experiment with new looks, or simply enjoy a low-maintenance styling solution. Among the most popular and enduring styles are braids, and within this category, the “feed-in” technique has revolutionized how braids are created, offering a more natural and seamless finish. At the forefront of this trend, particularly for its elegant simplicity and striking impact, is the style known as 2 Feed In Braids. This guide delves deep into everything you need to know about this iconic hairstyle, from its fundamental techniques to its myriad benefits and essential care.
What is 2 Feed In Braids?
At its core, 2 Feed In Braids refers to a protective hairstyle characterized by two distinct cornrow braids that are created using the “feed-in” technique. Unlike traditional cornrows where all the braiding hair is added at the very beginning of the braid, the feed-in method involves gradually adding small pieces of braiding hair to your natural hair as you braid. This technique is crucial because it creates a seamless transition from your natural hairline into the braid, making it appear as though the braids are growing directly out of your scalp. This natural look is one of the primary reasons for its widespread appeal.
The “2” in 2 Feed In Braids specifically denotes that the style features two main braids. These braids typically start from the front of the head and extend towards the back, often following the natural curve of the scalp. While the classic configuration is two straight-back braids, variations exist where the braids might curve gracefully around the head, be parted down the middle or to the side, or even incorporate subtle design elements at the front. Regardless of the exact path, the defining characteristic remains the pair of beautifully integrated, tension-minimizing braids.
The foundation of feed-in braids is the cornrow technique, which involves braiding hair very close to the scalp in an underhand motion. As the natural hair is braided, small sections of synthetic braiding hair (often Kanekalon or X-Pression pre-stretched hair) are seamlessly introduced and incorporated into each stitch. This gradual addition not only creates a smooth, natural-looking start but also distributes the weight of the added hair more evenly, significantly reducing tension on the hairline and scalp. This makes 2 Feed In Braids an excellent choice for those concerned about edge damage or discomfort often associated with traditional braiding methods.
Historically, cornrows have been a staple in African cultures for centuries, rich in cultural significance and artistry. The feed-in technique is a modern evolution that enhances the comfort and aesthetic of these traditional styles, making them even more accessible and protective for contemporary hair care needs. The simplicity of two braids allows for a bold yet understated elegance, suitable for a wide range of occasions and personal styles.
Key Features
The popularity of 2 Feed In Braids stems from a unique combination of aesthetic appeal, protective qualities, and practical benefits. Understanding these key features helps to appreciate why this style remains a go-to choice for so many.
- Natural-Looking Finish: The most distinguishing feature of feed-in braids is their seamless appearance. By gradually adding braiding hair, there’s no bulky knot at the start of the braid, making it look as though the braids are an extension of your natural hair. This creates a very polished and organic aesthetic that many find appealing.
- Reduced Tension and Edge Protection: Traditional braiding methods can sometimes place excessive tension on the hairline, leading to discomfort or even traction alopecia over time. The feed-in technique minimizes this risk by distributing the weight of the added hair more evenly across the scalp and along the length of the natural hair, making it a much gentler option for your delicate edges.
- Versatility in Styling: While the core concept is two braids, the style offers surprising versatility. The braids can be styled straight back, curved gracefully, or angled to the side. Furthermore, once completed, the two braids can be left loose, tied into a low ponytail, or even manipulated into a bun or other updo for different looks. The length and thickness can also be customized to suit individual preferences.
- Excellent Protective Style: 2 Feed In Braids effectively tuck away your natural hair, shielding it from environmental damage (sun, wind, pollution), manipulation, and heat styling. This allows your hair to rest and grow, making it an ideal choice for those on a healthy hair journey. It helps retain moisture and reduces breakage, contributing to overall hair health.
- Longevity and Low Maintenance: Once installed, 2 Feed In Braids can last anywhere from 2 to 4 weeks with proper care, sometimes even longer depending on hair type and maintenance routine. This extended wear time makes them an incredibly low-maintenance option, freeing up time from daily styling routines.
- Customization Options: Beyond the basic two-braid structure, there are numerous ways to personalize the style. You can choose different colors of braiding hair to create highlights or ombre effects, add hair jewelry (cuffs, rings), or vary the size and tightness of the braids. This allows for a unique expression of personal style.
How to Get Started
Achieving a flawless set of 2 Feed In Braids requires careful preparation and a methodical approach. While many opt for professional installation, understanding the process is beneficial whether you’re doing it yourself or instructing a stylist. Here’s a practical guide to getting started:
1. Hair Preparation: The Foundation of Success
- Cleanse and Condition: Start with freshly washed and deep-conditioned hair. Use a clarifying shampoo to remove any product buildup, followed by a moisturizing conditioner to ensure your hair is soft, pliable, and easy to work with.
- Detangle Thoroughly: After conditioning, gently detangle your hair using a wide-tooth comb, starting from the ends and working your way up to the roots. Ensure there are no knots or tangles, as this will make the braiding process much smoother and less painful.
- Moisturize and Protect: Apply a leave-in conditioner or a moisturizing cream to your damp hair. Follow up with a light oil (like jojoba or argan oil) to seal in the moisture. If you plan to blow-dry, use a heat protectant.
- Stretch Your Hair: For easier braiding and a neater finish, it’s often recommended to stretch your hair. This can be done by blow-drying on a cool setting with a concentrator nozzle or by air-drying in large braids or twists. Avoid excessive heat to maintain hair health.
2. Gather Your Tools and Materials:
- Braiding Hair: High-quality synthetic braiding hair (e.g., Kanekalon, X-Pression pre-stretched hair) is essential. Pre-stretched hair is particularly good for feed-in braids as it has tapered ends, making the feeding-in process smoother and the finished braids lighter. You’ll typically need 2-4 packs, depending on desired length and thickness.
- Rat-Tail Comb: Indispensable for creating sharp, precise parts.
- Hair Clips: To section off hair and keep it out of the way.
- Braiding Gel/Edge Control: To slick down your natural hair, create crisp parts, and tame flyaways for a neat, long-lasting finish.
- Scissors: For trimming stray hairs or cutting braiding hair.
- Setting Mousse: To finish the braids and set them, reducing frizz.
- Hair Tie/Bands: To secure the ends if needed.
3. The Braiding Process (Simplified):
- Parting: Use your rat-tail comb to create a clean, sharp part down the middle of your head, from front to back, dividing your hair into two equal sections. You can also opt for a side part or a curved part if desired. Clip one section out of the way.
- Starting the First Braid: Take a small section of hair at the very front of one of your main sections. Apply a small amount of braiding gel or edge control to this section. Begin to cornrow your natural hair, braiding very close to the scalp.
- Feeding in Hair: After a few stitches of your natural hair, introduce a small piece of braiding hair underneath one of the outer strands of your cornrow. Braid this piece in seamlessly, ensuring no bulk. Continue to add progressively larger pieces of braiding hair as you move down the braid, gradually increasing its thickness. The key is to add small, thin pieces at first to maintain the natural look at the root.
- Continuing the Braid: Maintain consistent tension as you continue to cornrow, ensuring the braid is neat and uniform. Continue feeding in hair until you reach the desired thickness for the main body of the braid. Once you’ve added enough hair, continue braiding down to the ends of the hair, incorporating all the synthetic hair.
- Finishing the Ends: Once you reach the end, you can secure the braid with a small hair tie or dip the ends in hot water (if using synthetic hair) to seal them and prevent unraveling.
- Repeat for the Second Braid: Unclip the other section of hair and repeat steps 2-5 to create the second feed-in braid. Ensure both braids are symmetrical in size and tension.
- Final Touches: Apply a generous amount of setting mousse to the entire head of braids. This helps to lay down any flyaways, add shine, and give the braids a polished, long-lasting finish. Tie a silk scarf around your head for about 30 minutes to set the style.
Tips for Success
To ensure your 2 Feed In Braids look their best and last as long as possible, incorporate these expert tips:
- Prioritize Hair Health: Always start with clean, deeply conditioned, and moisturized hair. Healthy hair is more resilient and less prone to breakage during the braiding process. A good leave-in conditioner is your best friend.
- Invest in Quality Braiding Hair: The type of braiding hair you use makes a significant difference. Pre-stretched braiding hair is highly recommended as it’s lighter, reduces tangling, and has tapered ends that blend seamlessly, making the feed-in process much smoother and the final look more natural.
- Master the Art of Sectioning: Clean, precise parts are fundamental to neat and professional-looking feed-in braids. Use a rat-tail comb to create crisp lines and clip away sections you’re not working on to keep them out of the way. Imperfect parts can detract from an otherwise well-executed style.
- Maintain Consistent Tension: While it’s crucial not to braid too tightly (which can lead to discomfort and damage), maintaining consistent, even tension throughout each braid is key for a uniform and long-lasting style. Uneven tension can result in lumpy braids or braids that unravel quickly.
- Moisturize Your Scalp and Braids: Even with a protective style, your scalp and hair underneath need moisture. Use a lightweight oil or scalp spray to moisturize your scalp regularly (every 2-3 days). You can also lightly mist the braids with a hydrating spray to keep them looking fresh.
- Protect Your Style at Night: To extend the life of your braids and prevent frizz, always sleep with a silk or satin scarf or bonnet. This reduces friction against pillows, which can cause frizz and loosen the braids prematurely.
- Consider a Professional: Especially if you’re new to feed-in braids, consider having a professional stylist install them. They have the expertise to create neat parts, apply consistent tension, and execute the feed-in technique flawlessly, ensuring a beautiful and protective result.
Common Mistakes to Avoid
While 2 Feed In Braids are a fantastic protective style, certain pitfalls can compromise their longevity, appearance, and even your hair health. Be mindful of these common mistakes:
- Braiding Too Tightly: This is perhaps the most significant mistake. Excessive tension, particularly around the hairline and edges, can lead to severe discomfort, headaches, inflammation, and worst of all, traction alopecia (permanent hair loss). Always communicate with your stylist if you feel any discomfort during the braiding process.
- Neglecting Hair Preparation: Skipping steps like thorough cleansing, deep conditioning, and detangling will result in frizzy, dull, and harder-to-manage braids. Unprepped hair is also more susceptible to breakage during braiding.
- Using Too Much Product: While styling products are necessary, over-applying heavy gels or creams can lead to product buildup, flakiness, and weigh down your braids, making them look greasy and attracting lint. Use products sparingly and focus on the roots and parts.
- Ignoring Scalp Care: Just because your hair is braided doesn’t mean your scalp doesn’t need attention. Neglecting to moisturize and cleanse your scalp can lead to dryness, itchiness, and even dandruff. Use a diluted astringent or witch hazel for gentle cleansing between washes.
- Keeping Braids in for Too Long: While braids are a protective style, they are not meant to be permanent. Keeping 2 Feed In Braids in for more than 4-6 weeks can lead to excessive product buildup, tangling, and matting of your new growth, making removal difficult and potentially damaging.
- Improper Removal: Rushing the removal process or pulling out braids can cause significant breakage and damage to your natural hair. Always take your time, use a conditioner or oil to lubricate the hair, and gently unravel each braid from the bottom up.
- Not Sealing the Ends: If you’re using synthetic hair, failing to properly seal the ends (e.g., by dipping them in hot water) can lead to unraveling and a messy appearance over time.
FAQ
How long do 2 feed-in braids typically last?
With proper installation and maintenance, 2 Feed In Braids can last anywhere from 2 to 4 weeks. Some individuals may extend this to 5 weeks, but generally, it’s recommended to remove them around the 4-week mark to allow your scalp to breathe and prevent excessive new growth from tangling.
Can I wash my hair with 2 feed-in braids?
Yes, you can gently wash your scalp and braids. Focus on cleansing the scalp with a diluted shampoo or a braid spray cleanser. Gently massage the shampoo into your scalp with your fingertips, then rinse thoroughly. Avoid vigorous scrubbing to prevent frizz. Follow up with a light leave-in conditioner or braid spray to re-moisturize. Ensure they are fully dry to prevent mildew.
Are 2 feed-in braids suitable for all hair types?
Yes, 2 Feed In Braids can be installed on most hair types, from fine to thick, and straight to coily. The key is proper hair preparation and using the correct tension. For finer hair, stylists might use smaller sections of natural hair and less braiding hair to minimize weight and tension. For coarser hair, ensuring thorough detangling and moisturizing is crucial.
How do I take out 2 feed-in braids without damaging my hair?
To safely remove your braids, start by cutting the braiding hair at the length where your natural hair ends. Apply a generous amount of conditioner or oil (like olive, coconut, or argan oil) to the braids to lubricate and soften them. Gently unravel each braid from the bottom up, using your fingers or a rat-tail comb. Take your time, be patient, and avoid pulling or ripping through any tangles. Once all braids are out, detangle your hair thoroughly before washing.
✨ The Ultimate Skin & Hair Care Kit
The best makeup in the world cannot hide poorly treated skin or damaged hair. If you want to glow from the inside out, these 5 science-backed formulations and trusted tools are the absolute essential core of any functional, results-driven beauty regimen.
🐌 COSRX Snail Mucin 96% Repair Essence
The Korean skincare secret that completely revolutionized Western beauty routines. Applying this deeply hydrating, lightweight essence absolutely transforms dull, textured skin overnight into a plump, hydrated, and insanely smooth canvas.
🧪 Paula's Choice 2% BHA Liquid Exfoliant
Stop aggressively scrubbing your face. This gentle, leave-on chemical exfoliant sinks deep into pores to dissolve blackheads, visibly shrink enlarged pore size, and effectively erase stubborn acne breakouts without leaving your skin red or irritated.
🩹 Mighty Patch Original Hydrocolloid Stickers
The ultimate emergency fix. When you feel a massive blemish forming, do not pop it! Stick one of these medical-grade patches on overnight and watch it completely absorb all the impurities while protecting the skin from scarring.
💨 Revlon One-Step Volumizer Hot Air Brush
Achieve a massive bouncy, salon-quality blowout at home in literally half the time. This ingenious tool dries, brushes, and heavily volumizes your hair all at once, completely saving your arms from the exhausting juggle of a round brush and heavy dryer.
💧 Olaplex No. 7 Bonding Hair Oil
If you use heat tools or color your hair, this is non-negotiable. This highly concentrated, weightless styling oil instantly tames frizz, dramatically increases shine, and actually repairs broken hair bonds while providing up to 450°F heat protection.
Conclusion
2 Feed In Braids stand as a testament to the beauty, versatility, and protective power of braided hairstyles. Offering a sleek, natural-looking finish with the added benefit of reduced tension on your edges, this style is a fantastic choice for anyone seeking a stylish yet low-maintenance hair solution. Whether you’re looking to protect your natural hair, experiment with length and volume, or simply enjoy a chic and effortless look, 2 Feed In Braids deliver on all fronts.
By understanding the meticulous preparation required, appreciating the nuanced feed-in technique, and committing to diligent care, you can ensure your braids not only look stunning but also contribute positively to your hair health journey. Embrace the elegance and practicality of this timeless style, and let your 2 Feed In Braids be a beautiful expression of your personal aesthetic and commitment to healthy hair.